The Rural Technology Initiative ceased operations in 2011. This site is maintained as an archive of works from RTI collaborators from 2000 to 2011 and is no longer updated. RTI's successor and remaining staff can be found at NRSIG.org


Search the RTI Website
 
Click to go to the Precision Forestry Cooperative website
Click to go to the RTI Home page
Click to go to the About RTI page
Click to go to the RTI Projects page
Click to go to the RTI Publications page
Click to go to the RTI Tools page
Click to go to the RTI Geographic Information Systems page
Click to go to the RTI Streaming Video Directory
Click to go to the RTI Training page
Click to go to the RTI Contacts page
Click to go to the RTI Image Archive
Click to go to the RTI Site Map
Click to go to the RTI Links page


3D Maps

*** Back to Desktop Mapping Information for Resource Managers ***

Three dimensional photos and maps can help resource managers quickly analyze hydrologic, aesthetic, habitat type, fire suppression and other site management factors. Once mastered, the steps in creating 3D land images are fairly simple.

Click to enlarge
Click to enlarge
Click to enlarge
Click to enlarge
Click to enlarge
Figure A
Figure B
Figure C
Figure D
Figure E

Four programs featured in the Mapping Toolbox will easily generate 3D views:

  • Global Mapper produces a simple 3D view from a vertical perspective if you load a Digital Elevation Model (DEM) and turn on hill-shading (as shown in Figure A). You can use the Control Center/Options command to apply a bitmap layer as a texture map to the DEM for a 3D effect. Version 4.74 and later of Global Mapper adds advanced blending capabilities for raster layers as shown in the image to the right.
Click to enlarge
  • 3DEM first loads a Digital Elevation Model, which can then be rotated and viewed from any angle. You can work with just the Digital Elevation Model if you wish, but the real power of 3DEM is its ability to add an overlay or "skin" from a 2D image over the top of the terrain model (click Figures B-D, above, for information about how the views were created).
  • Surfer 8 is a powerful surface generation program capable of producing a variety of 3D maps (see Figure E).


  • Manifold, a comprehensive GIS program, has a compelling 3D engine. Click successive views of the 3D elevation map on the right for an example with terrain features labeled.
Click to enlarge
Below are three images that show (1) a conventional aerial photo, (2) a bare 3D terrain model and (3) the previous two elements combined. Note that the hill shadows, which are not the same in the second and third images, illustrate how the position of the light source can be moved in 3DEM. You'll get a more realistic overlay image in 3DEM if you adjust the "sun" position to correspond with the shadows in the original aerial photo.


Conventional Aerial Photo
Bare 3D Terrain Model

Click for full-screen image
Conventional Aerial Photo and Bare 3D Terrain Model Combined

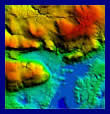
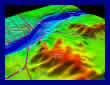
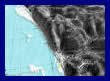
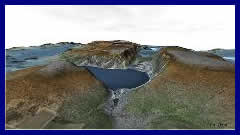
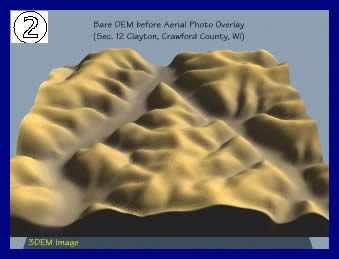
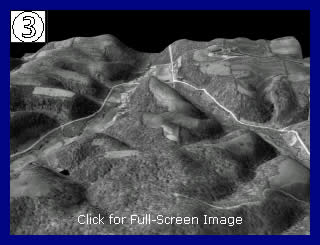
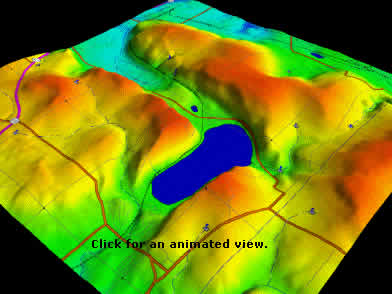
Overlay Techniques

3DEM works with two layers: the elevation model and one overlay image. As such, it does not have the ability of Global Mapper to add multiple data layers. By using 3DEM and Global Mapper together you can have the best of both programs. As explained in Figures B and E, above, Global Mapper can be used to produce overlays that incorporate multiple geospatial data layers. Save a screen capture of a Global Mapper image to use it as an overlay in 3DEM.

3DEM can use images from many sources: screen captures, Digital Ortho Photos, USGS Digital Raster Graphics, GeoTiff files, TerraServer images, etc. The trick is to be able to register the overlay image so that it exactly lines up with the underlying DEM. To achieve that, 3DEM has a geo-referencing dialog box. The user places two crosshair markers on the overlay image, entering the latitude and longitude of the two points (generally a point in the upper left and one in the lower right of the overlay).

Perhaps the easiest way to get the coordinates for the reference points is to open the overlay source first in Global Mapper. Global Mapper gives a readout of the cursor's latitude/longitude coordinates as you move it around the screen. (In the Global Mapper configuration dialog, choose to display latitude/longitude in decimal degrees, the system used by 3DEM.) Place the cursor over a couple reference points and write down the values. In the case of a screen capture, you'd record the coordinates of the upper left and lower right image corners. If you use a screen capture program (like GadWin Print Screen), save the "client window" to capture just the image area. Otherwise, get the coordinates of prominent features like road intersections that will be easy to relocate in 3DEM.

Click for an animated view
Note: If you have a registered version of Global Mapper, you can save a GeoTiff file of a multi-layered view, which 3DEM can open and automatically position with no fuss. Click the image to the left for a quick, two-step procedure.


3D Animations

After creating an overlay view in 3DEM, you can produce animated flyover movies. You can also make a movie of the 3D view rotated on an center axis. If you have a broadband Internet connection, 
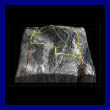
click the image below for a small (678KB) sample animation of Devil's Lake State Park, Wisconsin. The overlay image used here is a screen capture from Global Mapper. (Compression causes a loss of clarity, so keep in mind the originals 3DEM produces will be more vivid.)

For additional ideas, see the gallery at 3DEM. To delve further into the creation of interactive 3D scenes and ecological and geophysical modeling, visit the Virtual Terrain Project.

 
School of Environmental and Forest Sciences
USDA Forest Service State & Private Forestry
WSU Cooperative Extension
The Rural Technology Home Page is provided by the College of Forest Resources. For more information, please contact the Rural Technology Initiative, University of Washington Box 352100 Seattle, WA 98195, (206) 543-0827. © 2000-2004, University of Washington, Rural Technology Initiative, including all photographs and images unless otherwise noted. To view the www.ruraltech.org privacy policy, click here.
Last Updated 10/13/2022 12:33:47 PM