|
 |
 |
 |


*** Back to 2D Maps for Resource Management ***
This section focuses on working with images that can be used for base maps. Aerial photographs, topographic maps or other geographic images that can be used as a guide are generally the starting point for creating an new map. TerraServer Aerial Photo and DRG Images
Manual TerraServer Downloads
*Note: Changing file names and extensions can be difficult with Windows Explorer. You might want to get a free utility called PropertiesPlus, described in the Toolbox. To use it, you'd right-click a file's name, choose PropertiesPlus from the list that appears and then make the changes you want from the dialog box that opens. Automatic Downloads with USAPhotoMaps
Merging Images with USAPhotoMaps-BigJPEG
|
||||||||||||||||||||||||||||||||||||||||||||||||||||||||||||||||||

 |
In this example, USAPhotoMaps displays
the track in blue and a waypoint as a green dot. (Click the
image for additional
information.) The program will add text labels where you choose.
You can use USAPhotoMaps to manage your GPS track and waypoint records, retrieving past activities to reload into your GPS device. |
 |
You can create new waypoints on a TerraServer image (either on a photo or a USGS topographic map) by left-clicking on locations with your mouse. The program asks for a waypoint name, which you provide. You can send the newly created positions to your GPS unit so you can find those locations in the field. |
If you travel with a GPS unit and laptop PC, USAPhotoMaps can even be used as a live display to show your location on a photo as you move. If you plan to use the program that way, download your background aerial photos in advance.
 |
Merging Images with Global MapperIf you need a number of TerraServer download images to cover the area you want to map (say you want a detailed aerial photo covering four square miles at 1-meter resolution), how would you put the photos together as one image? Global Mapper can do it in a snap. Here's how: 1. Before you start downloading multiple images from TerraServer, create a directory that would hold them. For example, you might make a directory named "Delton" for your Lake Delton aerial photos. 2. Download each photo you want (click on the TerraServer compass rose to move to different images to download). Name the images consecutively (e.g., download1, download2, etc.) You must also save the corresponding "GIS World Coordinates" as download1.txt, download2.txt, etc. 3. After you have all the pictures you want, find the image and text files with Windows Explorer. Select all the image files, right click them, and add a "jpg" extension to each. (This can be done as a batch with PropertiesPlus.) Also, select all the text files and change their extension to "jpgw". 4. You can now start Global Mapper and open each of the photos into the current view. Global Mapper will put them all together as a single image. If you have the registered version of Global Mapper, you can save the whole group as a single GEOTIFF file. If not, you can still get a screen capture of the assembled images. (Before doing a screen capture, you might want to ramp up the resolution of your monitor as far as it will go. The more pixels you capture, the better the image.) |
|
|
GEOTIFF, MrSID, ECW or other Digital Image Files
You might have access to DOPs or DRGs (usually in some sort of compressed format like MrSID or ECW) from commercial vendors or from natural resource agencies. See Basic Map Data for sources. Programs like Global Mapper, ArcExplorer 2, MrSID GeoViewer, MrSID Viewer, ERDAS ViewFinder and others can be used to view those images.
Geospatial images might cover a much larger area than you want to map. The programs mentioned above allow you to clip out a portion of a large file and save it as a conventional image file. Some of the programs will save the GIS World Coordinates of a clipped image. The registered version of Global Mapper is probably the easiest tool for saving a clipped image along with the world file coordinates. The free LizardTech MrSID utilities will do a nice job for files in the MrSID format.
You can also get clip images from programs like Global Mapper and ArcExplorer through screen captures. You can use those programs to create images with multiple DLG layers (section lines and streams are often among the most useful to add over the tops of aerial photos). When you have a view you like, take a screen shot. (It might help to ramp up your monitor resolution before doing so.) If you wish, you can geo-reference the captured image.
As an example, Figure 1 is a screen capture from Global Mapper
showing a Digital Elevation Model (DEM) and Digital Line Graph (DLG)
transportation data for Devil's Lake State Park in southern Wisconsin.
(Hill shading in Global Mapper has been turned off.) After capturing
the view but before leaving Global Mapper, the cursor was moved
to both the upper left and lower right corners, and the latitude/longitude
of each location was noted for the next step.
Figure 1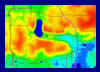 |
As an example, Figure 1 is a screen capture from Global Mapper showing a Digital Elevation Model (DEM) and Digital Line Graph (DLG) transportation data for Devil's Lake State Park in southern Wisconsin. (Hill shading in Global Mapper has been turned off.) After capturing the view but before leaving Global Mapper, the cursor was moved to both the upper left and lower right corners, and the latitude/longitude of each location was noted for the next step. |
Figure 2 |
In Figure 2, the screen capture is used as an overlay in 3DEM to create an oblique 3D view of the park. The view can be rotated to any angle. The latitude/longitude of the two corners (saved as explained above) orients the overlay to the underlying elevation model. |
Geo-Referencing Aerial Photos that are Scanned for Base Maps
If you have an aerial photo print or paper map (perhaps more recent
than TerraServer images or for an area where you don't have digital
coverage), you can use a flatbed scanner to convert the image to
digital format. Some of the programs in the Toolbox
like 3DEM, OziExplorer and Map Maker have fairly simple methods
for registering a scanned image for internal use of the programs.
If you want to use a scan with other geospatial data, however, you
will need to create a GIS World Coordinate file for it. The following
tutorial explains the contents of a world coordinate file and how
to create one.
|
Important!
|
| If you expect to routinely use scanned aerial photographs for base maps in geospatial mapping programs, the images should be corrected for distortions so they reflect true ground positions. The procedure is called rectification. Click here to learn more. |
Approximating a UTM World Coordinate File for a Scanned Image
Professional GIS programs like ArcView have extensions for image registration, but you might not have access to such a program. Following is a relatively simple procedure to geo-reference a scanned photo with free resources available on the Internet. It is not exact and cannot be used for a scan that covers more than a few square miles.
- On the photo to be scanned, mark two points that are a known distance apart. If nothing else, mark two points a mile apart based on the photo scale. If you have a thin ruler or printed scale, you could instead lay that on the photo and include it in the scan.
- Scan the photo (or part of it) at a resolution that captures enough information for your purpose without creating an image file that will overwhelm your computer's memory.
- In your photo-editing program, make any adjustments you want for contrast/brightness/sharpness. (You might also need to rotate the image by the magnetic declination of your area so that it is aligned to the grid north of any other projection/datum for data you intend to use with the scanned image. This might be a trial and error process.)
- In the photo-editing program, you will need to crop the picture so the upper left (NW) corner falls on a landmark (e.g., a road intersection, field corner, etc.). You need to be able to see the same landmark on other geo-referenced data (such as a TerraServer image, DRG or DLG source that can be viewed in a program like Global Mapper or USAPhotoMaps that gives UTM coordinates). Save the cropped image as a "jpg" file with minimal compression.
- Next, you need to create a GIS World Coordinate file for the scanned image. The coordinates will be stored in a text file that has the same name as the image file, except it must end with a "jpgw" extension. The text file would contain numbers similar to the right column in the example below:
| A. | X-scale (meters per pixel in the X direction) |
1.282090
|
| B. | Rotation in X direction (assumed = 0) |
0.000000
|
| C. | Rotation in Y direction (assumed = 0) |
0.000000
|
| D. | Negative of Y-scale (meters per pixel in the Y direction) |
-1.282090
|
| E. | UTM Easting Coordinate of the center of the upper left pixel of the scanned image |
730691.000000
|
| F. | UTM Northing Coordinate of the center of the upper left pixel of the scanned image |
4797771.000000
|
That is, the "jpgw" text file for the example would look like this:
1.282090
0.000000
0.000000
-1.282090
730691.000000
4797771.000000
![]()
The trick is to get the values for A, D, E and F.
As implied in Step 4, E and F can be found with programs like Global Mapper or USAPhotoMaps that provide a readout of UTM coordinates as you move the cursor across the screen. While viewing geospatial data with such a program, observe the UTM coordinates of the landmark used for the NW corner of the scanned image. Enter the values for E and F in your table. Here's a screenshot from USAPhotoMaps showing how to get UTM coordinates:
There is a formula to estimate the values of A and D based on the dpi of your scan and the scale of the parent photo you scanned. I've had better success, though, by importing the scanned photo into Map Maker Gratis and getting the scale factor from that program. Gratis has a bitmap utility to calibrate a scan.
Use the "single point + known distance" procedure on the photo marks (or on the ruler you included in the scan) made in Step 1:
a) Open the scanned photo with the Map Maker menu choice shown above
b) Pan the photo to find the first marked reference point from Step 1
c) Right-click the first point to start the calibration
d) Place a cross-hair on the first point and click it
e) Pan to the second reference point from Step 1; point and click it
f) Enter the distance in meters between the two points in the dialog box that opens (if the two points you chose are exactly one mile apart, enter 1,609.344 meters).
 |
Map Maker Gratis then gives you an
option to save a separate world text file for the image or to
use a proprietary registration method. For this procedure,
choose the world file option. Map Maker creates a text file
with a "jpw" (not "jpgw') extension.
Open the "jpw" text file that Gratis makes with Notepad or other text editor and observe the values it uses for the A and D pixel scale factor. Copy those values into your own "jpgw" text file table that has the UTM coordinates for the origin (E and F). |
|
Of course, if you intend only to use the scanned photo in Map Maker, the registration file it creates will be adequate. With it, Map Maker will calculate reasonably accurate areas and distances on the scanned photo. The world file with the UTM coordinates, however, can also be used with other geospatial data (but remember to enter the correct UTM Zone number if needed). Use these procedures at your own risk. They will only approximate a world file registration for a scanned image. Precision image registration is much more complex, requiring rectification of the image. *** Back to 2D Maps for Resource Management *** |
|
![]()