forestandrange.org home || learning options || further assistance
Lesson 6: Measuring Trees
Review and Introduction
In Lesson 4 and Lesson 5, you learned how to establish either a fixed plot or a variable plot. With your plot established and your “in” trees tallied, now it is time to measure the trees in the plot as representative samples of the trees in your stand.
Learning Objectives:
By the end of this lesson, you will be able to:
- Measure tree diameter at breast height (DBH)
- Measure total tree height
- Determine the live crown ratio
- Determine tree age
Materials Needed:
- Diameter tape or woodland stick
- Clinometer or woodland stick
- Increment borer (optional)
- Data recording sheets
I. Getting Started
You will need to record data about the trees in your plot. We suggest downloading and printing a plot data recording sheet to help you organize your data. You can print a sheet for each plot that you plan to do, and they can even be printed on waterproof paper (available from forestry suppliers) to create durable, all-weather plot cards. The data recording sheet with this lesson was specifically designed for use with the LMS Inventory Wizard software (which will be covered in Lesson 8), but it is useful even if you do not plan to use the software.
First record tree species for each tree in your plot. Books on tree identification are commercially available and may also be available at your local library. Your Local Extension Forester is another good source for tree identification resources, some of which may be available at no charge from your local Extension Service.
II. Measuring tree diameter
After recording tree species, the next step is to measure the diameter of each tree. Diameter is the width of a circle or cylinder; in this case the stem of the tree. Tree stems have taper (they are slightly cone-shaped), such that they are wider at the base and narrower further up. Thus, diameter will vary based on how high up on the stem of the tree you measure it.
A standardized height for measuring tree diameter has been established. This is known as breast height, which is defined as 4.5 feet (54 inches) above the ground, on the uphill side of the tree. Use a measuring tape to figure out how high up breast height is on you. Memorize this spot (e.g. the next to the top button on your shirt or coat)1 so that as you stand next to a tree, you know where to measure diameter. Breast height must always be measured from the uphill side of the tree if it is on a slope.
Using a diameter tape
We will talk about two ways to measure diameter at breast height (DBH). The most accurate way is to use a special measuring tape known as a diameter tape. A diameter tape is calibrated such that circumference measurements are automatically converted to diameter (i.e. the measurement units have been divided by the constant Pi so that you do not have to do the mathematical conversion from circumference to diameter). Thus while you are physically measuring the circumference of the tree, you are reading the measurement in diameter units.2 If you do not have a diameter tape, you can use a regular cloth measuring tape and divide your circumference measurement by Pi (3.14) to convert to diameter.
To measure DBH, wrap the diameter tape around the tree at breast height, making sure the tape is level and not twisted. Most diameter tapes will give you diameter to the nearest 1/10th inch. The diameter measurement is read where the tape overlaps with the zero marker (Figure 6-1). If the tree is large, it is helpful to work with a partner to wrap the tape around the tree. Many diameter tapes also have a nail or hook on the end that you can stick into the tree to hold the end of the tape in place while you wrap it around.
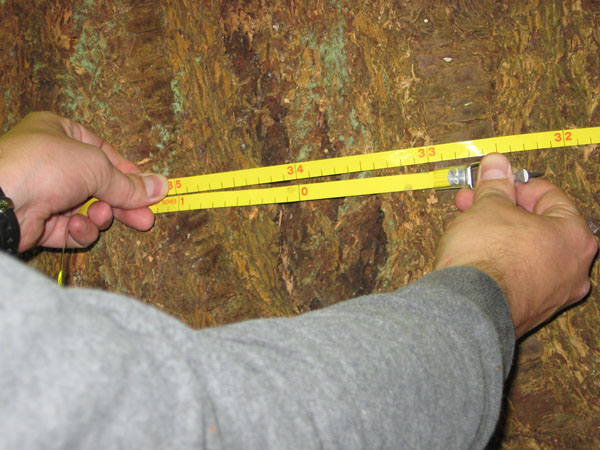 |
Figure 6-1: To measure DBH, wrap a diameter tape around the tree at breast height, making sure the tape is level and not twisted. The diameter measurement is read where the tape overlaps with the zero marker. In this case, the DBH of this tree is 34.0 inches. |
![]() Watch a video clip of how to use a diameter tape.
Watch a video clip of how to use a diameter tape.
Using a woodland stick
A second way to measure DBH is to use a woodland stick (also called a Biltmore stick or a cruiser stick). These special measuring sticks are inexpensive compared to diameter tapes
Quick steps – Measuring DBH with a woodland stick
|
and they are quick and easy to use, but they are not as accurate as a diameter tape.
To use a woodland stick, find the side of the stick that is marked for tree diameter. With this side facing you, hold the stick up against the tree at breast height. The stick should be 25 inches away from your eye, which is a comfortable arm’s reach for an average person. Keeping the stick level and perpendicular to your line of sight, visually line up the left side of the stick with the left edge of the tree. Now, keeping your head still, move your eyes to the right edge of the tree and read where it falls on the stick (Figure 6-2). Note that woodland sticks usually only measure to the nearest inch (not as precise as the diameter tape). Since trees are not perfect cylinders, you should measure two adjacent sides of the tree and average the values together to estimate DBH.
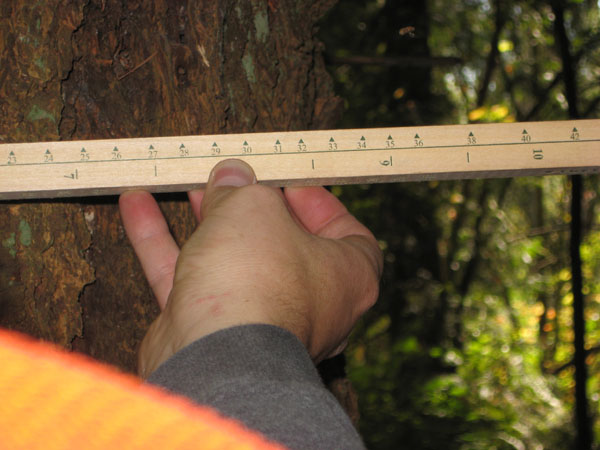 |
| Figure 6-2: To measure DBH with a woodland stick, hold the stick against the tree at breast height, 25 inches from your eye. Keeping the stick level and perpendicular to your line of sight, line the end up visually with the left side of the tree. Then move your eyes (not your head) to read diameter on the right side of the tree. In this case, the tree whose DBH measured 34.0 inches with the diameter tape in Figure 6-1 measures between 33 and 34 inches with the woodland stick. |
![]() Watch a video clip of how to measure DBH with a woodland stick.
Watch a video clip of how to measure DBH with a woodland stick.
III. Measuring tree height
After recording diameter for each tree, the next step is to measure a few tree heights. Unlike with diameter, you may not need to measure the height of every tree in the plot if you are going to be using the Landscape Management System (LMS) computer program (Lesson 8 and Lesson 9) with your inventory data. However if you plan to manually compute variables such as tree volume per acre (Lesson 10), you may need to measure every tree height.3
If you are using LMS, in general you should plan to measure a minimum of one tree height per plot. As with other aspects of inventory sampling, it is desirable to be systematic when selecting a tree to take a height measurement. One method is to start from either north or whatever direction you were traveling to reach your plot, go clockwise around your plot and select the first “in” tree to use for your height measurement. The tree should be representative of your plot in terms of species and size. For instance, if your plot is predominantly comprised of large, dominant conifers and the first tree you come to is a suppressed hardwood or a tree with a broken top, do not use that tree for your height measurement. Rather, keep moving clockwise until you find the first tree that is adequately representative of the trees in your plot.
If you have several key species present in your plot, you may wish to work your way around the plot and select the first adequately representative tree of each species. If you wish to compute site index (Lesson 7), make sure you include height measurements for several dominant trees of whatever species you wish to compute site index for.
Using a clinometer
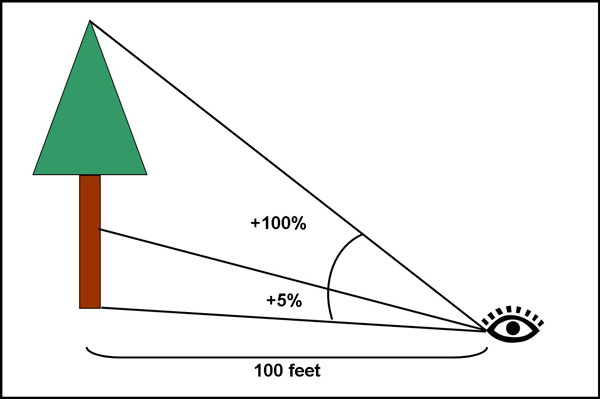
As with DBH, we will talk about two different ways to measure height. The first way is to use a tool called a clinometer. A clinometer is a vertical angle gauge that measures the slope from your eye to either the top or bottom of the tree. Looking with one eye into the hole of the clinometer, you will see a graduated scale showing the slope measurements. The scale will move up or down as the clinometer is tilted up or down. Different clinometers measure slopes in different units, so it is important to consult the instructions for your clinometer to confirm what units are being measured. Commonly clinometers list the slope in degrees on the left half of the scale and in percent on the right half of the scale. The steps described below correspond to percent slope measurements. By definition, percent slope is the distance up or down per 100 feet of horizontal distance. Thus a reading of 30% means a height or depression of 30 feet, when measured at 100 feet horizontal distance.
When measuring the height of a tree, you will need to move away from the tree to a place where you can see the top. While you can choose any distance at which you can see the top of the tree and the clinometer reading is not off the scale (usually 150%, though accuracy may deteriorate beyond 120% or so), because you are working in percent a distance of exactly 100 feet will greatly simplify the calculation to determine tree height. For trees that are tall enough such that 100 feet is not far enough back to accommodate the scale of the clinometer (or to see the top of the tree), you will have to move back further to obtain an accurate reading. For very short trees, you may only need to move back 50 or 75 feet.
You can measure your distance away from the tree using a cloth measuring tape or a retractable logger’s tape. When choosing a spot from which to measure a tree, if you are on a slope try to stay on the same level as the tree. If you go significantly uphill or downhill from the tree, your distance measurement (and subsequent height measurement) will not be accurate.
Quick steps – Measuring tree height with a clinometer
Example:
|
Once you have measured the distance from the tree, you can use the clinometer to measure the slope between your eye and both the top and bottom of the tree (Figure 6-3). Looking into the clinometer with one eye (you cannot actually look through the clinometer) and sighting the top of the tree with your other eye, visually line up the horizontal marker in the clinometer with the top of the tree (Figure 6-4). It may take some practice to get your eyes to work together for this. Once the horizontal marker in the clinometer is lined up, read the corresponding value on the percent scale. Now repeat this procedure for the bottom of the tree.4
Assuming the angle to the top of the tree reads a positive value, if the angle to the bottom of the tree reads a negative value, you add the bottom value to the top value to get the total percent slope. In the case where the angle to the bottom of the tree also reads a positive value, such as when you are standing downhill from the tree (Figure 6-5), you would instead subtract the bottom value from the top value to get the total percent slope.
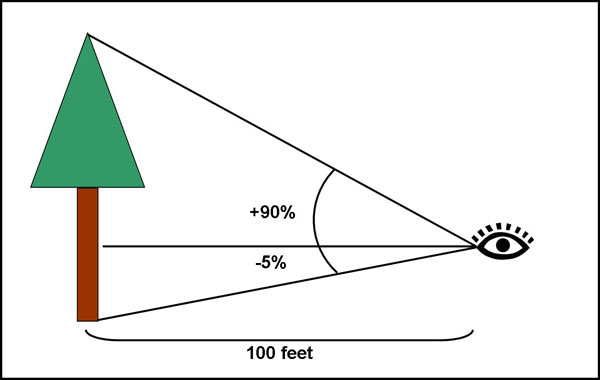 |
Figure 6-3: A clinometer measures the percent slope between your eye and both the top and bottom of the tree. In this case the clinometer reads 90% up and 5% down, for a total of 95%. Since the tree is 100 feet away, the height of the tree is 0.95 x 100 = 95 feet. |
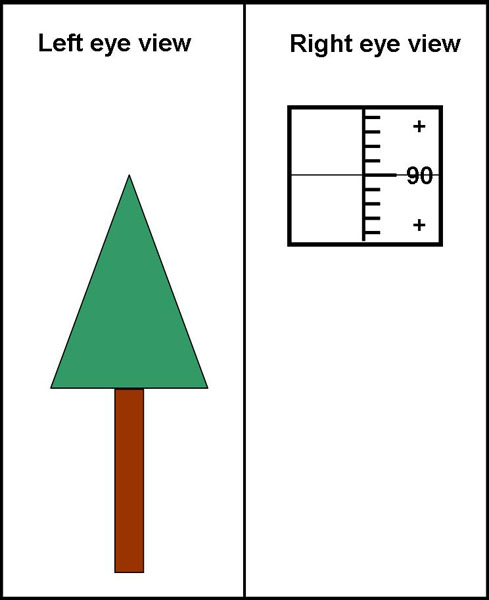 |
| Figure 6-4: When using a clinometer, look into the clinometer with one eye and look at the top of the tree with the other. Line up the horizontal marker in the clinometer with the top of the tree and read the value (in this case 90%). |
 |
| Figure 6-5: When standing downhill from the tree, the clinometer may read up to the bottom of the tree rather than down. In this case the 5% up to the bottom of the tree would be subtracted from the 100% up to the top of the tree for a total of 95%. Since the tree is 100 feet away, the height of the tree is 0.95 x 100 = 95 feet. |
The total percent slope is equal to vertical distance (i.e. the total height of the tree from top to bottom) divided by the horizontal distance away from the tree. Since we know the horizontal distance and the total percent slope, we can solve for tree height by multiplying the percent slope (expressed as a decimal) by the horizontal distance (Figures 6-4 and 6-5). This is why being exactly 100 feet away makes for the simplest calculation—a total slope of 95% (0.95 if expressed as a decimal) means the tree is 95 feet tall (e.g. Figure 6-4). When using horizontal distances other than 100 feet, such as in brushy conditions, it may be helpful to have a hand calculator to assist with the calculation.
![]() Watch a video clip of how to measure tree height with a clinometer.
Watch a video clip of how to measure tree height with a clinometer.
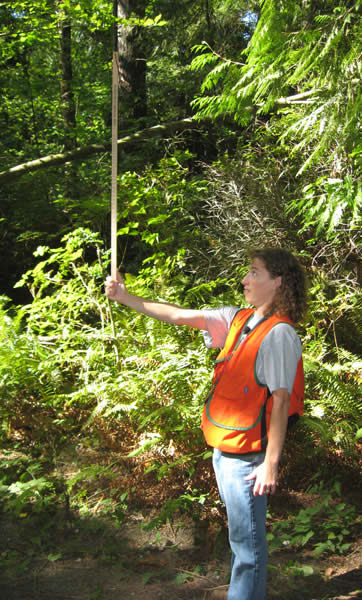
Using a woodland stick
You can also measure tree height using a woodland stick. This is an inexpensive option if you do not have a clinometer, though it is not as accurate. Similar to using a clinometer, you will need to use a cloth tape or logger tape to measure back from the tree a specified distance. With the woodland stick, though, this is a fixed, prescribed distance, usually 66 feet or 100 feet depending on your region and the stick you are using. Find the side of the woodland stick that is marked for tree height, and with this side facing you, hold the stick vertical. The stick should be 25 inches away from your eye, which is a comfortable arm’s reach for an average person. Keeping the stick straight, visually line up the bottom of the stick with the bottom of the tree (Figure 6-6). Now, keeping your head still, move your eyes to the top of the tree and read where it falls on the stick (Figure 6-7).
 |
Quick steps – Measuring tree height with a woodland stick
|
| Figure 6-6: When measuring height with a woodland stick, hold the stick 25 inches from your eye and keep the stick vertically straight. |
 |
| Figure 6-7: When measuring height with a woodland stick, visually line up the bottom of the stick with the bottom of the tree and then, moving your eyes and not your head, see where the top of the tree falls on the stick and read the corresponding height value. |
![]() Watch a video clip of how to measure tree height with a woodland stick.
Watch a video clip of how to measure tree height with a woodland stick.
IV. Determine live crown ratio
The live crown ratio is the proportion of a tree’s height that is green or in crown (Figure 6-8). This can be determined with a simple visual estimate. Live crown ratio should be estimated for each tree in the plot.
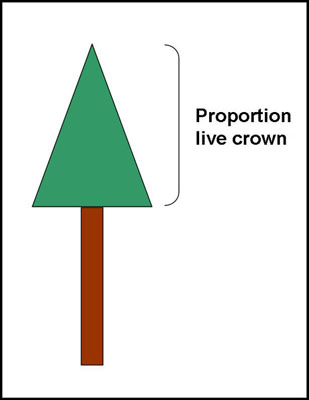 |
| Figure 6-8: The live crown ratio is the proportion of the height of the tree that is green; in this case approximately 50%, which is commonly recorded as 0.5. |
V. Determine tree age (optional)
While tree age is not a required part of forest inventory, it may be useful to gather this information. You can determine the age of a stand by taking ages of several dominant trees from different plots and computing the average of these values. You may also want to measure the ages of the same dominant trees for which you measured height, in order to compute the site index of your stand (Lesson 7).
To determine the age of a tree, you will need a special tool called an increment borer. An increment borer is a hollow drill that allows you to extract a thin segment of wood called an increment core from the stem of the tree. The increment core will show the annual rings (Figure 6-9), which can be counted to determine tree age.
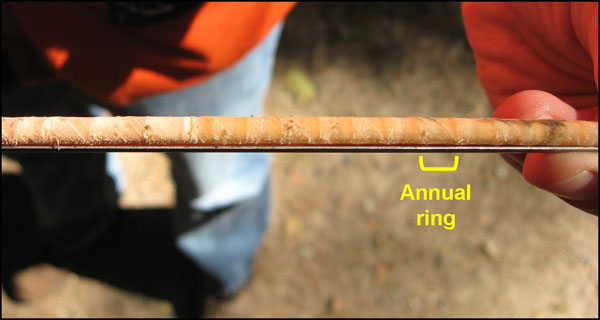 |
| Figure 6-9: An increment borer allows you to extract a small core sample from the stem of the tree with which you can determine age by counting the annual rings. |
An increment borer has 3 parts: the handle, the bit, and the extractor (Figure 6-10). To assemble the increment borer, the back end of the bit fits into a notch in the center of the handle and clips into place (Figure 6-11). The extractor should be kept separate.5
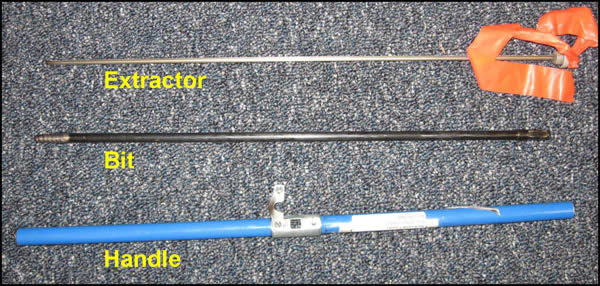 |
| Figure 6-10: An increment borer has three parts: the handle, the bit, and the extractor. |
 |
| Figure 6-11: An increment borer is assembled by inserting the back end of the bit into a notch in the center of the handle and clipping into place. |
To use the increment borer, begin drilling into the tree at breast height by turning the handle clockwise. Make sure to keep the increment borer level and drill straight in toward the center of the tree (Figure 6-12). You may need to apply pressure towards the tree when first starting until the bit catches on the wood (i.e. push and turn at the same time). You may hear creaking or popping sounds as you drill into the tree. Be sure to drill in far enough to reach the center of the tree.
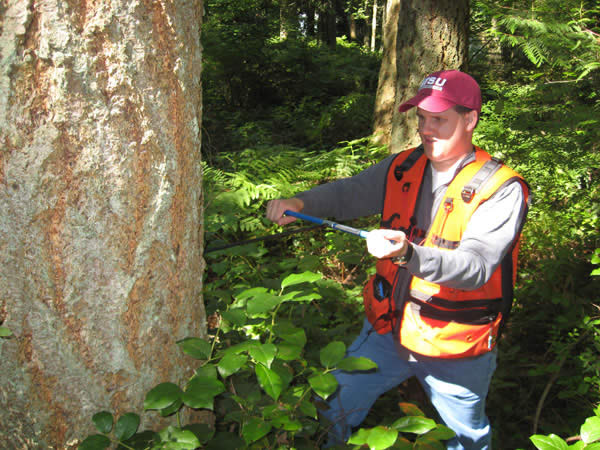 |
| Figure 6-12: When using an increment borer, drill in straight toward the center of the tree at breast height. |
Once you have drilled far enough to reach the center of the tree, carefully insert the extractor into the bit. You will feel some resistance. Once the extractor is all the way in, back the bit out one full turn (counterclockwise). Now slowly pull the extractor out; the increment core should come with it. If the core does not come out on the first try, reinsert the extractor and try again.
Once you have extracted the increment core, set it and the extractor aside. Be careful with the increment core, as it is delicate and may fall apart easily. You should immediately begin removing the bit from the tree by turning the handle counterclockwise, as the increment borer may become stuck if left in the tree too long.
Once the increment borer has been removed from the tree, you can return to your increment core and begin counting rings. If you successfully reached the center of the tree, you should see a round or oval shaped ring on the increment core that marks the center (Figure 6-13). Begin counting with this center ring and count outward to end of the increment core. Note that you are counting breast height age, which is typically the value of interest. If you also wanted to know the total age, adding 4-5 years to the breast height age will in most cases give you a reasonable approximation.
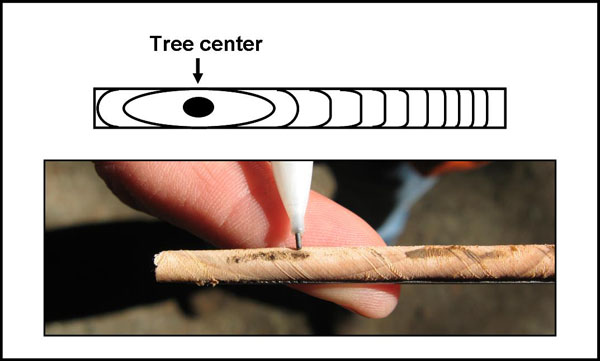 |
| Figure 6-13: Begin counting rings with the round or oval shaped ring that marks the center of the tree. |
Quick steps – Determine tree age with an increment borer
|
![]() Watch a video clip of how to determine tree age with an increment borer.
Watch a video clip of how to determine tree age with an increment borer.
When you have finished counting the rings, you may save or discard the increment core. Inserting the core back into the tree is not recommended, as this may introduce pathogens into the stem of the tree. The tree should be able to heal from this small wound on its own and is not likely to suffer any ill effects.
It is important to take care of your increment borer so that it will last you for many uses. Make sure to always protect the sharp end of the bit from getting chipped or dented. Do not let it come in contact with metal or rock. Should you need to sharpen the bit, consult the instructions that came with your increment borer for proper procedures. After you have finished using the increment borer, you can clean it by wiping down the pieces with a soft cloth. Rubbing beeswax on the exterior of the bit will protect the surface and provide lubrication for future uses. You may also wish to spray a small amount of aerosol lubricant inside the bit for protection, lubrication, and to dissolve tree pitch.
|
Next Steps:
- Test your knowledge by taking a Short Quiz.
- Go to the Next Lesson.
1If you always wear the same cruiser vest, you can permanently mark a spot on it that is 4.5 feet above the ground as you are wearing it.
2Note: in many European countries, foresters use the circumference, called “girth”, but in the US and Canada, our forestry measurements are based on diameters.
3If you are going to compute volume manually using a volume table or volume equation (see Lesson 10), you may need the height of each tree. Some volume tables only require DBH, and there are also some inventory systems, such as the Tariff System in the Pacific Northwest, which allow volume to be computed using detailed measurements such as height from only a few trees. If you plan to compute volume manually, get help from your local Extension Forester to determine what tree height information you will need to utilize a locally applicable volume table.
4It may be helpful to have a partner stand at the base of the tree you are measuring. This will help you determine where the base of the tree is. Your partner can also shake the tree to help you identify the top—you would be surprised at how seemingly insignificant thrusts against even a large tree can cause the top to noticeably move.
5The extractor is easily bent or lost in heavy brush. We suggest that you tie a piece of bright-colored ribbon on to the extractor that will make it easier to find in the event it is dropped.