forestandrange.org home || learning options || further assistance
Lesson 7: Gathering Stand-Level Information
Review and Introduction
In previous lessons, you learned how to establish and take measurements in sample plots. Now we will begin to transition toward using this data in a computer program called the Landscape Management System (LMS). LMS is a unique and innovative program that allows you to work with your inventory data to:
- Generate statistics about your forest
- Create representative images of your forest
- Predict how your forest will grow and change over time depending on how you manage it
- Experiment or play “what-if” games with different management alternatives
In addition to your plot data, you will need some overall information about your stand in order to use LMS.
Learning Objectives:
By the end of this lesson, you will be able to:
- Select an appropriate growth model in LMS for use in your location
- Get soil information for your property from the NRCS Web Soil Survey
- Determine site index for your stand(s)
- Determine other relevant stand-level information
Materials Needed:
- Windows®-based computer1 with internet access
- LMS software (available for free download)
- Stand data recording sheets (supplied with LMS)
- Clinometer (optional)
- Site index curves (optional)
I. Introduction to LMS and growth models
Tree species, tree growth rates, and other forest conditions vary greatly from region to region. One of the values of using a computer program like LMS with your inventory data is that it has many different region-specific components that make the program appropriate for local conditions in most forests of the United States.
LMS is not a single program, but rather a series of different programs working together seamlessly behind the scenes. Some of the core components of LMS are called growth models.
Installing the LMS Software If you have not yet installed the LMS software, it is available for free download from http://lms.cfr.washington.edu/download/. The procedures described in this web module pertain to LMS 2.x, which is recommended for most family forest applications. Once the software is installed, find the LMS program group on your computer’s Start Menu. You will find several programs in this group, including the LMS program itself and another program called the Inventory Wizard. The Inventory Wizard is a special companion to LMS that will take your inventory data and create an LMS dataset, which is called a portfolio. The Inventory Wizard will be covered in more detail in Lesson 8. For this lesson, you will use the Inventory Wizard to select a growth model that is appropriate for the location of your forest. |
Growth models use the inventory information you provide to calculate certain values about your forest today (e.g. volume of wood, trees per acre, etc.) and to predict how your forest will grow and change in the future.
Growth models in LMS are location-specific. When you begin using LMS, you will be asked to choose a growth model. Which growth model you select will determine the stand-level information that you will need.
Once you have installed the LMS software on your computer, start the Inventory Wizard program. From the Main Menu, select the Getting Started option, followed by Growth Model Selection Guide (Figure 7.1). Follow the prompts through the Growth Model Selection Guide to get a recommendation of which growth model to use. You may get multiple recommendations, in which case you may choose any of the recommended options. Take note of the recommended growth model and click OK to return to the Getting Started Menu.
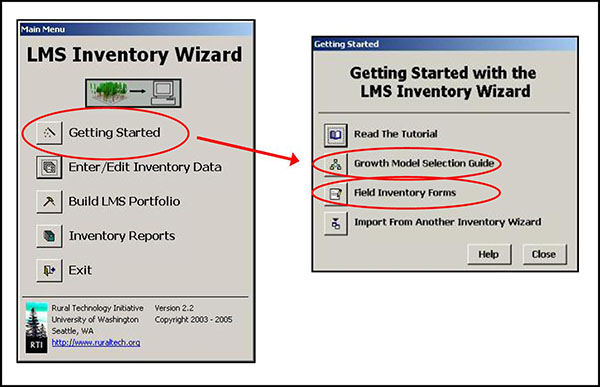 |
| Figure 7-1: From the Main Menu, click on ‘Getting Started’ to bring up another menu where you will find the Growth Model Selection Guide and Field Inventory Forms. |
Once you are back at the Getting Started menu, select the option for Field Inventory Forms (Figure 7-1). At the top, you will find a link to the Basic Plot Data Form, which is the same form you used in Lesson 6. Below that you will find links to a series of stand data forms, each one specific to a regional growth model (Figure 7-2). Select the link that corresponds to the growth model that you selected. This will bring up a PDF version of that stand data form.
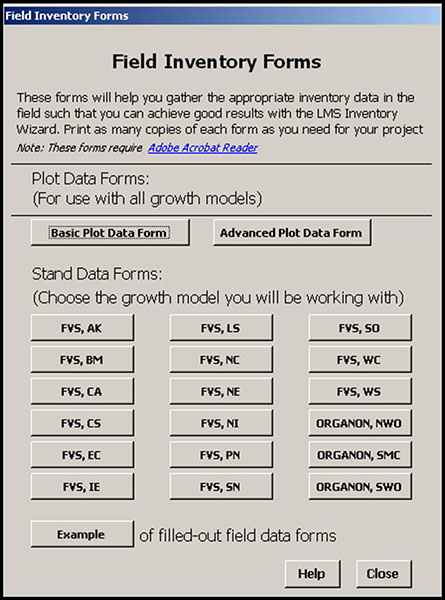 |
| Figure 7-2: Each growth model has its own unique stand data form. |
|
II. Fill in basic stand data
The stand data forms are slightly different for each growth model. Certain parts will be similar regardless of your location, though. The stand data form will indicate what pieces of information are required vs. recommended. Required elements include:
- Stand Name – Give your stand a name, making sure it is one word with no spaces.
- Stand Acreage – Use your acreage estimate from Lesson 1.
- Inventory Year – Fill in the year in which you are collecting the inventory data.
Some growth models will also ask for a location, such as the nearest national forest. In these cases, a list to choose from will be provided with the stand data form.
Most growth models will ask for a stand site index. Typically you will be asked to provide a site index value for a particular species (e.g. sugar maple in the Northeast, red pine in the Great Lakes, Douglas-fir in the Pacific Northwest). There are several ways to determine site index.
III. Determine site index
Site index is a measure of the productivity of a site based on how tall trees will grow over a specified period of time. It is called an index because values are indexed to a given number of years (the base age), usually 50 or 100. For example, a 50-year site index of 120 means that at age 50, the dominant trees (of the given species) would be expected to be 120 feet tall. The higher the site index, the more productive a site is for growing a given species. Adding site index to your use of LMS allows the growth models to be more accurate for your forest.
Site indexes are usually expressed as a series of concentric curves. Figure 7-3 shows an example of site index curves for Douglas-fir (King, 19662). Any measured height and age could be plotted to see which site index curve it falls on. Another term to be familiar with is site class, which is a range of site indexes. In Figure 7-3, Douglas-fir site class II refers to the site index range between 115 and 135.
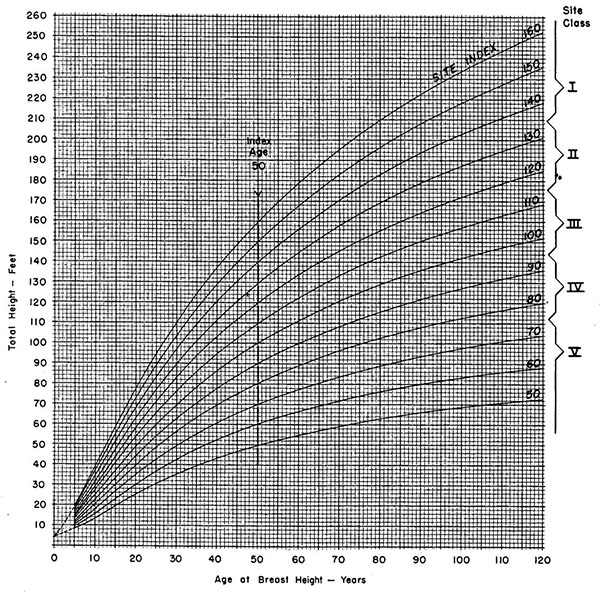 |
| Figure 7-3: Example site index curves for Douglas-fir (From: King, J.E. 1966. Site index curves for Douglas-fir in the Pacific Northwest. Weyerhaeuser Forestry Paper, No. 8, Weyerhaeuser Co., Forestry Research Center, Centralia, WA). Site indexes are expressed as a series of concentric curves. Site index can be determined by plotting the total height of a dominant tree against its breast height age and seeing which curve it falls on. |
Determine site index from soil maps (recommended method)
One of the easiest ways to determine average site index is to look it up on a soil map. Customized soil maps can be created using the Web Soil Survey (http://websoilsurvey.nrcs.usda.gov/), a free website provided by the USDA Natural Resource Conservation Service (NRCS). Here are some quick steps to get site index data from the Web Soil Survey:
- Start the Web Soil Survey by clicking the green button (Figure 7-4).
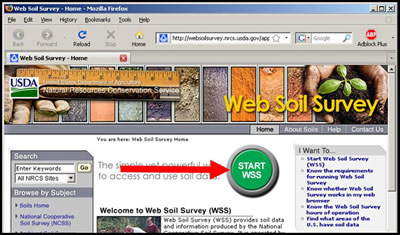
Figure 7-4: The Web Soil Survey is located at http://websoilsurvey.nrcs.usda.gov/. Start by clicking the green button.
- Make sure you are on the Area of Interest Tab. On the Quick Navigation menu on the left, you can search for your property by several criteria, such as by the property address. When you have entered your property information, press View (Figure 7-5).
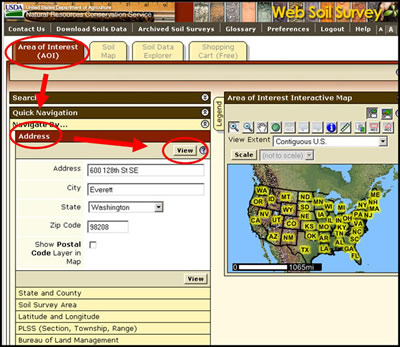
Figure 7-5: You can search for your property by address or other attributes.
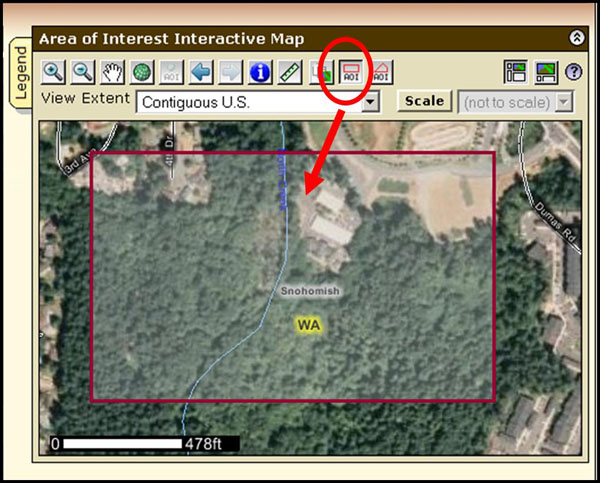
- You should then get an aerial image of your property vicinity. Click the red rectangle button that says AOI and use your mouse to draw a rectangle around your property (Figure 7-6). Your Area of Interest should now appear as a blue hatched area.
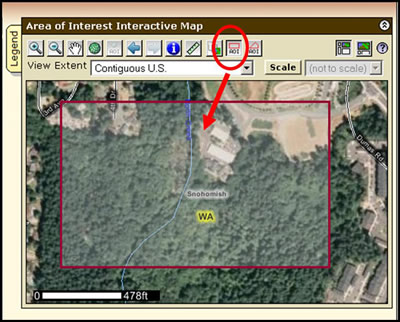
Figure 7-6: To define your Area of Interest, click the button with the red rectangle that says AOI and then use your mouse to draw a rectangle around your property.
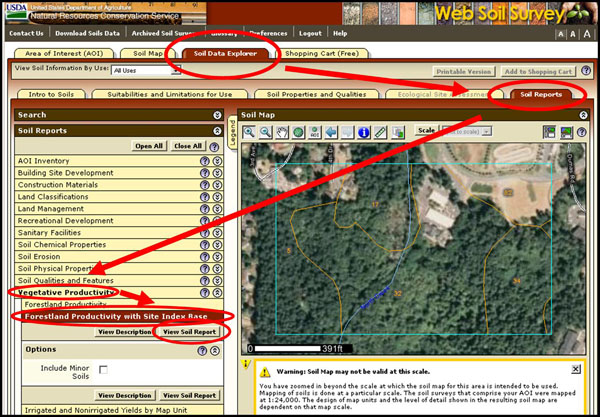
- Switch to the Soil Data Explorer tab. Notice that the aerial image of your property now has numbered polygons – these are the soil types on your property. Click on the Soil Reports sub-tab. From the menu on the left, select Vegetative Productivity and below that Forestland Productivity with Site Index Base. Click View Soil Report (Figure 7-7).
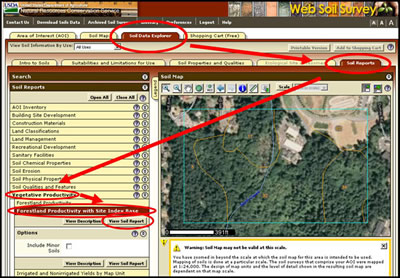
Figure 7-7: Navigating to the Forestland Productivity report.
- You will now get a list of site indexes by species with base ages for each soil type on your property (Figure 7-8).
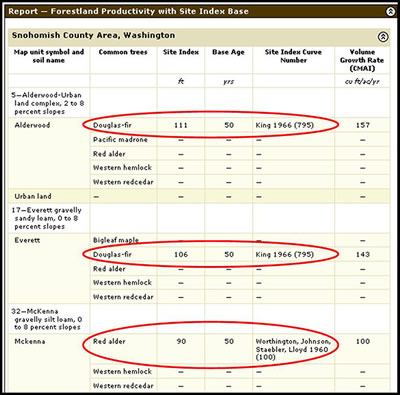
Figure 7-8: Forestland Productivity report showing site indexes by species and soil type.


Compare the soil map displayed in the Web Soil Survey to your stand map from Lesson 1 to determine what soil type corresponds to what stand. If you have multiple soil types in one stand, choose the one that is most representative of the stand. Make sure that the species, base age, and site index curve number from the Web Soil Survey correspond to what is requested on the Stand Data Form (Figure 7-9). If the Web Soil Survey offers site indexes for additional species, you can record those on your form under Additional Site Index(es). See the back of the form for a list of recognized species, base ages, etc.
Determine site index from inventory data (alternative method)
You can also calculate site index based on the inventory data you collected, specifically tree heights and ages for dominant trees. If you wish to calculate the site index of a stand this way, it is best to obtain heights and ages for several dominant trees of a given species. Estimate site index from your sample trees by comparing their age and height to a site index curve or table (Figure 7-3). Consult your Local Extension Forester for information on obtaining appropriate site index curves or tables for your area. Compute the site index using each of your site index sample trees and use the average value for the stand site index.
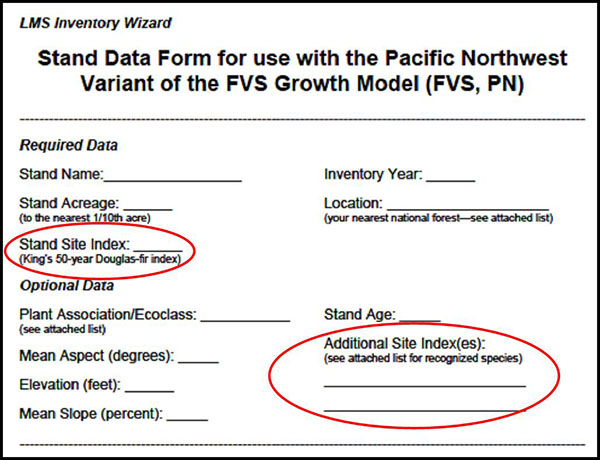 |
| Figure 7-9: Your stand data form will specify the species, base age, and reference that is needed for the stand site index. Compare this to the site index information listed on your soil survey to ensure that you use the correct site index. Site index values for additional species may also be entered if available. |
IV. Other Relevant Stand Information
Depending on the growth model you are using, you may have the opportunity to use additional stand-level information to better calibrate the model to your forest conditions. These data are optional and include:
Percent Slope
You can measure the percent slope of the ground in your stand using a clinometer. Holding the clinometer parallel to the slope, look either uphill or downhill at an object that is approximately the same height above the ground as your eye, such as a spot on the trunk of a tree (Figure 7-10). Visually line up the marker in the clinometer with this object and read the value on the percent slope scale of the clinometer. The slope will likely be variable throughout your stand, so try to measure the slope in an area that is most representative of the slope of the stand or measure in several locations and compute an average.
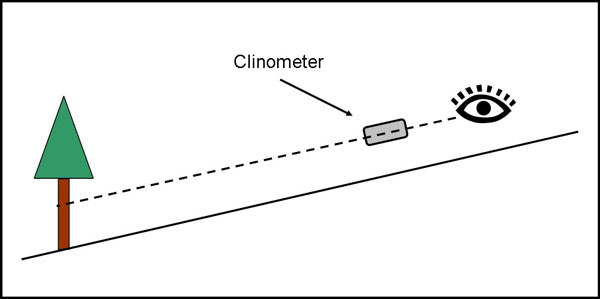 |
| Figure 7-10: To determine slope with a clinometer, hold the clinometer parallel to the slope and look either uphill or downhill at an object that is approximately the same height above the ground as your eye, such as a spot on the trunk of a tree. |
Aspect
If your stand is on a slope, the aspect is the direction the slope faces (given as an azimuth, 0 – 360 degrees). Here are some common aspects:
- 0° – Flat
- 45° – Northeast
- 90° – East
- 135° – Southeast
- 180° – South
- 225° – Southwest
- 270° – West
- 315° – Northwest
- 360° – North
You can estimate aspect based on your stand map or by using a hand compass in the field. As with slope, the aspect will likely be variable throughout your stand, so pick an aspect that is most representative of the stand.
Elevation
If you do not know the approximate elevation of your property, you may be able to determine it using an online mapping tool such as Google Earth (http://earth.google.com/), or with a GPS device, etc.
|
Next Steps:
- Test your knowledge by taking a Short Quiz.
- Go to the Next Lesson.
1LMS will work with Windows 98 and later, including Vista. It is not compatible with other operating systems (Macintosh, Linux, etc.). For more information on system requirements, visit http://lms.cfr.washington.edu/
2King, J.E. 1966. Site index curves for Douglas-fir in the Pacific Northwest. Weyerhaeuser Forestry Paper, No. 8, Weyerhaeuser Co., Forestry Research Center, Centralia, WA.