forestandrange.org home || learning options || further assistance
Lesson 3: Locating Plots on the Ground
Review and Introduction
So far, you have identified individual stands in the forest, learned about plot sampling, and marked locations on a map of where your inventory sample plots will go. Now it is time to head to the woods and locate on the ground the plots that you have marked on your map.
Learning Objectives:
By the end of this lesson, you should be able to:
- Pace out distances in the woods
- Set declination on a compass
- Follow a compass bearing in the woods
- Establish a plot center
Materials Needed:
- Measuring tape
- Compass
- Your map
- Colored ribbon
- Stakes or staff (optional)
I. Pacing
In Lesson 2, you established plot locations on a map with pre-determined distances (measured in chains) between plots and from a starting reference point. When locating these plots on the ground, you will need to measure out these distances. It can be onerous and time-consuming to use a measuring tape to measure out the distances in the woods. It is quicker and easier to pace out the distances.
Pacing is simply counting your steps. If you know how many steps (paces) it takes to travel one chain, you can count this out as you walk to estimate the distance. This estimation is not as accurate as actually measuring the distance, but it can be surprisingly close. More importantly, it is still part of a systematic way to locate inventory plots and any minor discrepancies between paced and actual distances should not introduce bias to the sample.
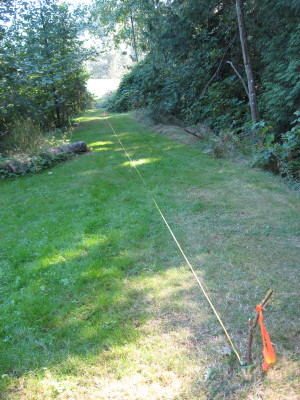
The first step in pacing is to figure out how many paces it takes you to walk one chain. To do this, find a flat, open area (a lawn or driveway work well) and use a measuring tape to mark out a course of one chain (66 feet). Walk the course several times, counting your paces as you go (Figure 3-1). When counting paces, you actually count every other step. In other words, lead with your left food and count every time your right foot hits the ground. Try to walk as naturally as possibly—do not take extra small or extra large strides. As you walk the course multiple times, you may get slightly different counts—use an average of these counts.
 |
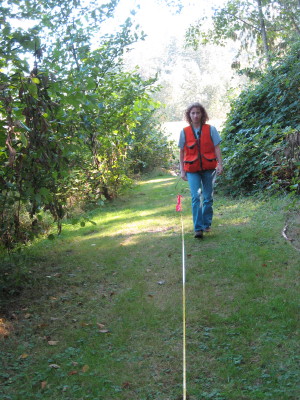 |
| Figure 3-1: Mark out a distance of 1 chain (66 feet) in a flat area such as your lawn or driveway. Walk this distance several times, counting your paces as you go. | |
![]()
Watch a video clip of how to measure your pace
When it comes time to pace in the woods, you may be walking through uneven or brushy conditions—much different terrain than your lawn or driveway. This rougher terrain will affect your strides, causing some to be shorter and some to be longer than the “normal” stride that you practiced. However, remember that pacing is an estimate, and although it is imperfect, the mix of longer and shorter strides that you take over uneven terrain in the woods will in many cases average out and yield a distance that is surprisingly close to accurate.
|
II. Setting declination on a compass
Not only do you need to go the appropriate distance in the woods; you also need to travel in the right direction! Recall from Lesson 2 that for each stand you established grid lines, originating at an identifiable reference point on the ground. You will need to use a compass to guide you in the direction of your grid line to find your plot.
When using a compass, it is important to set the declination for your location. Declination adjusts the compass for the difference between true or geographic north (i.e. the North Pole) and magnetic north, where the compass needle points, which is somewhere in the Canadian Arctic and shifts every year (http://gsc.nrcan.gc.ca/geomag/nmp/northpole_e.php). (For more information read a good Wikipedia article on declination: http://en.wikipedia.org/wiki/Magnetic_declination.)
NOAA has an online tool (http://www.ngdc.noaa.gov/geomagmodels/Declination.jsp) to compute declination your area. With this tool, you can enter your zip code to determine latitude and
Declination for your time and place: In 2008, the declination for Everett, WA (about as far west as you can get in the US outside of Hawaii and Alaska) was approximately 17° E. That means that magnetic north is 17 degrees east of true north for this location. Thus, we set the compass (using instructions with the compass) so that true north is determined and followed. Generally speaking, in areas west of the Mississippi River, magnetic north will be east of true. The further west you are the greater the declination will be. Near the Mississippi River, the delineation may be negligible, and east of the Mississippi magnetic north will be west of true. If you use your compass to lay out property boundaries, the setting of declination is critically important for accuracy. |
longitude, and then compute the declination, which will be yield both a number in degrees and a direction (either east or west).
Once you know the declination value for your area, you can set this on your compass (assuming that your compass is adjustable for declination—some less-expensive compasses may not be). This usually involves turning a small screw with a “key” provided with your compass. Consult the instructions provided with your compass to determine exactly how declination is adjusted with your specific model. As you set declination, be mindful that it can be east or west, so be sure to set it in the correct direction.
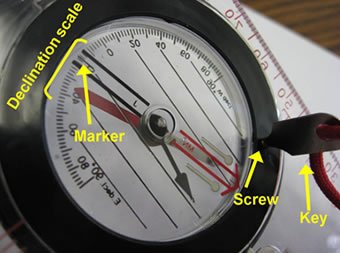 |
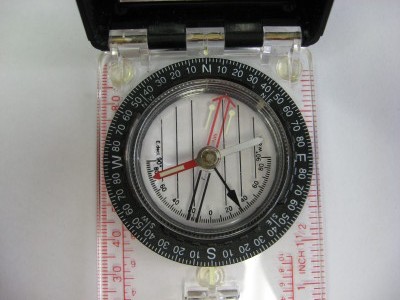
Figure 3-2: This compass has a special “key” that you use to turn a small screw on the bottom of the compass until the marker lines up with the appropriate value on the declination scale (read from the top side of the compass). Not all compasses do this the same way and some are not adjustable for declination—be sure to consult the instructions provided with your compass for details.
Once declination is set, your compass will now automatically account for the differences between true north and magnetic north and your compass will point to true directions based on your specific location. Because magnetic north continues to shift over time, you should check and update the declination of your compass every few years.
|
III. Find your direction of travel
Now that your compass is set for declination, you are ready to find your direction of travel on the ground. You should first determine where north is on your photo/map. All commercially available aerial photographs have true north at the top. If you obtained your aerial map from an internet source, be careful to note true north. Lay your compass on your map such that the edge of the compass lies along your grid line (pointed in the direction of travel). Turn the compass dial so that north on the compass dial is pointing towards north on your photo/map. The compass reading will give you the direction of travel for your grid line (Figure 3-3).
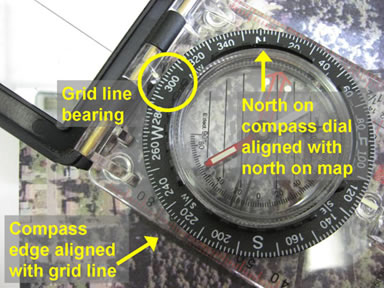 |
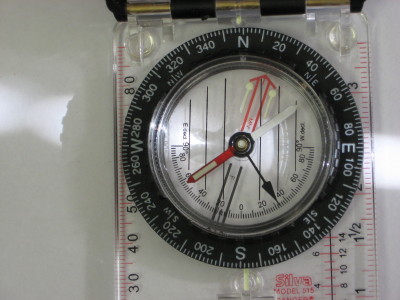
| Figure 3-3: The compass is laid on the map with the edge lined up with the grid line. North on the compass is lined up with north on the map, and the resulting compass reading is the direction of travel for the grid line, in this case 300º on an azimuth-style compass (see sidebar discussion of the difference between quadrant and azimuth compasses). |
Quadrants vs. Azimuth: There are two styles of compass: quadrant and azimuth. A quadrant compass (Figure 3-4a) is divided into 4 quadrants, each reading from 0º (starting with north or south) to 90º (ending at east or west). An azimuth compass (Figure 3-4b) reads from 0º (north) all the way around the compass to 360º (back to north).
If you want to travel northeast, on a quadrant compass this would be expressed as N 45º E (45º east of north). On an azimuth compass it would be expressed as 45º. Similarly, if you wanted to travel southwest, this would be expressed on a quadrant compass as S 45º W (45º west of south) compared to 225º on an azimuth compass. Make sure to note which type of compass you have and consult the operating instructions for your compass for more information. |
Once you have the bearing to your first plot, go to the starting reference point. Rotate the dial on the compass to align the direction you want to go. Now, holding the compass level, turn the whole compass until the needle lines up with the arrows. Your compass is now pointing the direction you need to go. As you travel, you will need to hold the compass level in front of you and keep the compass oriented such that the needle stays lined up with the arrows. If your compass has a mirror, your can tilt the mirror down to allow you to see the orientation of the needle while sighting through a notch at the top to sight your course ahead (Figure 3-5).
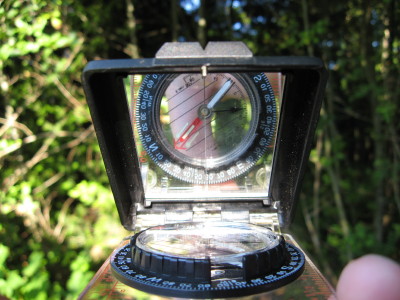 |
| Figure 3-5: If your compass has a mirror, you can use this to watch the needle and make sure it lines up while keeping the compass level. Sight through the notch at the top to see where you need to go. |
A helpful technique is to sight ahead and identify a feature that is along your travel direction (e.g. a tree). Walk towards this feature and, when you arrive, sight ahead to the next identifiable feature along your travel direction. Continue this until you have gone the correct distance (remember to count your paces!). It is often useful to leave a small piece of survey ribbon at the point you started, so that you can return to that place easily in the event that you forgot how many paces you went (or to retrieve that piece of equipment that was left behind!).
Note that, depending on your brand and style of compass, the technique may be slightly different than what we have shown here. Please be sure to read the operating instructions that came with your compass so that you know how to correctly operate it.
![]()
Watch a video clip of using your compass in the woods
IV. Locating plot center
Once you have paced the prescribed distance in the prescribed direction, you have arrived at your plot location. Your plot center should be wherever your right foot lands on your final pace. Mark this spot with colored ribbon. If you have a stake or a staff, stick it in the ground at this point and tie ribbon to it to mark your plot center. If you do not have stakes, a rock or sharp stick can serve as a makeshift plot center marker. An old broom handle, sharpened to a point at one end is a very good staff for marking a plot center.
Make sure that you stick to wherever your foot lands to identify plot center—do not try to move the plot towards a tree or an open area, as this will introduce bias. However, if your plot center falls at a place that is unsafe (bees’ nest, fire ant hill, abandoned well, etc.), do move the plot to a safer area (and note the unsafe area on your map!). Try to move the plot systematically, though. For instance, decide you will move the plot 1/2 chain north rather than just moving over to the nice, open area by the big oak tree.
|
Next Steps:
- Test your knowledge by taking a Short Quiz.
- Go to the Next Lesson.